Sunday 27 November 2011

v&a POWER OF MAKING

Power of Making at the V&A is amazing.

Thats all that needs saying really, I thought it was incredible.

It was packed with the most amazing objects and pieces that artists had made. Their imagination is incredible. What they think of creating, its just beatuiful. the craftmanship in some of the pieces are incredible. I was taken away by some of the pieces. Peter Butcher has created an embroidered surgical implant, as its easy to fit and more comfortable for the patients. It is the most intricate piece I have seen in a long time, just for surgery. Its made using machine emboridery, it was incredible.
Sarah Jane Willliams makes handmade lugage but it is beautiful, the time and cxare gone into her pieces is incredible. They are brief cases and suitcases but made in different shapes, some 90degree angles and curves they are incredible.

Sarah Jane Williams suitcase


Case by Sarah Jane Williams. It is a thing of beauty!


 This image below is of a hand cut christmas card by Thomas Heatherwick. Again I think its beatuiful, the care thats gone into it is amazing and it looks really fragile which I think is intriging in the piece. It folds out to be a snowflake which is amazing! He does a new one every year so I wonder what this years will be?


This image below is of a dress which is made by Thorurin Arnadottir, its called 'QR U?'. Its a dress made up of those scan barcodes you see around nowadays. Its amazing if you used your phone to scan the dress then you found out about it. Its all beaded, which is just amazing! WOW. I loved it!!!!


This exihibtion is incredible, I havent done it justice here, it is packed full of increible pieces and inspiration form all around the world which is amazing. It is worth going to see it, I promise you, you will not be disapointed. Its free also so you have no excuse for not going! GO GO GO GO and ENJOY

STITCH, WEEK2

Second tutorial with Isabel and it was a constructive one again.
She said that the graphoc feel in my drawings needs to come into my drawings a bit more.
I should also keep it simple, dont over complicate things. This is what I was doing with the wadding piece, the yellow cut work piece and the blue plastic cut work piece, layering them on top of each other, was over doing it. NO NO  NO.
Another thing Isabel said was that I should maybe place little pieces of colour beind some of the cut work pieces, to have a contrast to the stitch work. This I can see will be a good idea, and will work well.
Maybe make patterens with my drawings, have three in a row and other patteren ways.
She didnt like the purple, YUCK, which I can see actually I dont like it anymore, it is a bit of a vile colour. She wanted more of the red plastic, much better.
An idea was to get some calico and stitch a black line, and place some colour behind in some areas, like a green?
Keep the size A5 and maybe smaller.

It was good I'm pleased with how this project seems to be going! YAY

So I had a go at these things suggested above. See the photos below!

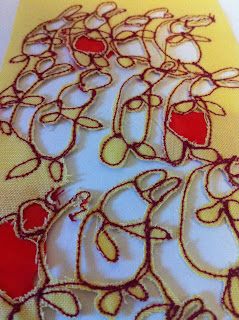
This piece below is one of my favourites, I like the colour and this allows the image to be shown really clearly. I tired putting little pieces of red behind parts of the bunnies and this has ben really succesful I think, it adds another dimension to the piece and this works really well I think. It quite a flat piece, but with the red it becomes 3D. I'm really pleased. The photography of all these image below I personally think is rather strong! Wooooooo


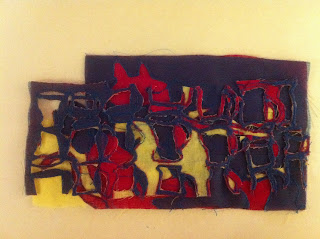
Below is the image of my cut work on fabric and plastic which I was going to layer on another piece of work, but didnt and they actually look really good together and I'm happy!!! The colours work well and together they have a good texture and depth so I'm not complaining.


This piece below is of honey pots, which I've stitched onto calico with a blue thread. I then filled in some parts with a yellow thread, which works well. I then cut around the middles of the pots for the cut work element. Due to the heaviness of the yellow stitch the fabric flapped and has fallen around the place, its neat and it place, and I like this element. Its a nice piece, its danity and almost elegant in some ways.


Last one of my four final pieces, and its on calico with a black stitch line. Its of donkeys on wheels, but it creates a nice pattern, which is what I'm after. The black line is really effective, its powerful and bold, like my drawings. I then added some green pieces of plastic under some of the donkeys heads, ( john lewis bag stripes!) this is really effective and I love it. I'm really pleased with this outcome!!


So above are my FOUR FINAL PIECES for stitch, and I'm really pleased. I've worked really hard and developed my ideas along the way. Gone down some paths, realised they are'nt the right paths, turned around and gone down another one, which has worked out for me! I've loved stitch.
We saw the 2nd Years show on thrusday and I was incredible, the work they are had done, the fact that everything is so different, but there are so many different aspects that you can do different areas. In stitch its so diverese which I like, it would give you so much to do, but then is that scary that theres so much that you can do? To much?
Anyway I have loved, and I just needed a little more time to do some more things!!!


LOVED STITCH.

STITCH, DAY3 (and a weekend)

Tutorial day. It went well, Isabel liked my progress and my start in exploring cut work.
She said that I should maybe explore a contemporary feel to my work by using plastic in my cut work, layering fabrics to see the layers underneath through the cut work.
Maybe also try different colours not just the blues, a red, yellow.
Try a red plastic bag.
Another idea she had was quiliting, maybe get a 3D effect from this, it would give me  a line to work with. Maybe also as my drawings are in squares to quilt them together?
Isabel also said as I have done some illustrive drawings I could do a whole piece like that, or so sections in patterens I create.
Last idea was to try some bigger disovelable fabric pieces.

All in all it was a very postive tutorial with lots of new ideas to try out! I was very excited about this prospect! Wooooooooooooooooo

So I had a go at almost everything she said to me, and I really enjoyed myself!

Below is a picture of my go at layering fabrics. I stitched three fabrics together, then I cut through the fabric to show the different colours. This I think is quite succesful, the colours work well together and work well being shown all together. I also had a go at embordiring onto this piece, I like the colours but I dont think it works on the piece really. They almost look out of place slightly.


The photo below is me trying to layer the fabric more. I sewed three pieces of fabric together, but then I cut it into three rectangle pieces, and these I did cut work into, and then I layered them together. So there are nice pieces of fabric all together, which I think works really well! It gives it a really nice 3D texture! Granted the photo quality isnt the best.


I tired it also on a bigger scale, but with an actually drawing behind it. There is a little mouse behind the cut work I have layered on top. This is successful I think as it breaks up the image and I like this, disstorting the image, not really know what you are seeing.


I had another go at disoveable fabric, this one didnt work as well, but I think its becasue the forst one was succesful that this one not so much. Again I couldnt get the tension to do what it should be doing. It looks slightly messy, with the fabric underneath it just doesnt look good. I'm not sure. The colours I dont think are correct either.


I started this piece below and didnt finish it. I had a go at useing the wadding on top of a piece I was working on, to give depth but on top of the piece instead of underneath like the other pieces I've been doing. I'm not to keen on this one either the colour doesnt work, it needs the yellow, it was going to have yellow layered on top, but I didnt finish it before my next tutorial when everything changed then anyway.


I like this photo below with the stitching behind it. I also like the one below this also.


Below is a piece which I was going to layer on top of the piece above. Its a huge (well not huge, but slightly large) piece of cut work which I sewed on the machince then partially cut into. I think its beatuiful and it works rather well. The yellow and the blue compliment each other really well! The shaping I really enjoy also, its just a really nice piece if I dont mind trumping my own trumpet! I havent layered it on the above piece as Isabel said I didnt need to, it spoke its own lanuage on its own. So I'm happy!


The piece below is of a blue plastic which I've sewn into, I had to put it between disovelable fabric as it wouldnt stitch on its own, silly thing! I sewed little bunnies on it. Again this piece with the above piece was to be layered onto the piece with the wadding. I'm pleased I havent done this as they are good on their own. Isabel said to try them with a little section of colour underneath certain parts and I've tired this below with the red, I didnt sew them on, but it looks nice placed on. 
I have actually layered both the yellow and the blue pieces together, the blue under the yellow and this works well. The textures also of the fabric and the plastic again work well! I'm pleased with the outcomes!


So this is what I was doing over the weekend and monday. I had a tutorial on the tuesday and some things changed in this tutorial also, which is good. I'm all about constructive critism, its the thing that gets you far its very important!!!!
My next post will tell you all about my tutorial, the suspense is going to kill you, dun dun dun!!!!!!!

STITCH, DAY2

I know I've been really bad about blogging for stitch but I've been doing loads of work for it that I havent had time for blogging! SORRY!
So after the first day of technique information day I went fabric shopping and I got two different sheer blues, a purple pink, and a cream for a bas fabric. Shepards Bush is amazing for fabric!
Wednesday was our proper day of being able to use the Bernina sewing machines. They are really good machines, when you get used to it they are great!
I was focusing on trying out the CUT WORK technique for my drawings. I used the sheer fabric so I stiffened it with bonda web so that it wouldnt fray when cutting it but it didnt work it still frayed but its alright! I like the look, I think it will give me alot to be able to work with over the next two weeks, its a very open technique!


You can see below that the fabric was fraying, not to badly but it was fraying! I really like the technique though its wide and will allow me to do alot, its not limited!


These photos below are my tryouts of having an embrodiery thread as the bobin. I think it woks well, its gives it a really strong line which is nice. I couldnt get the tension correct though. So some of the lines are taught, but its a good start I think. The colours I like.


You can see the line is thicker then normal coz thats the emboridery thread as the bobin. Its a lovely line I really enjoy it! YAY


This one below is one of my favourites as the white line agaisnt the blue is really bold and stands out which is great. Its showing my drawings well!


You can see though in the photos that the tension is right, it didnt want to work properlly which wasnt the best but what can you do?!


I also had a go at disovlable fabric with the embroidery thread as the bobin and this worked well also! Its a nice line and it looks quite clean. I really like it, I wish I hadnt run out of thread as I'd of liked it to be a bit bigger, a lareger piece, but I do like this.


Today was a good experiment into different ideas that I can have a go on in the next few weeks! I enjoyed today. We have tutorials tomorrow is Isabel and she will tell me if I'm going in the right direction!
I'm enjoying stitch so far! YAY

Tuesday 15 November 2011

DEGAS and the BALLET

Yesterday I went along the the exhibition shown at the Royal Acadmey, 'Degas and the Ballet'. It was amazing, I loved it the colours were incredible. His use of materials, the chalk I thought was beautiful. It was stunning really was, the way they layed it out showed his work in a brilliant light, we went to a private viewing of it with my Dads company, so there was lots of peolpe enjoying the exhibit which gave a fantastic atmosphere which is necessary to make it work. I thought it was fantasic.
Degas showed his passion for movement in the figure through drawing ballet dancers, which is really amazing. I cant express enough how much I loved it. He did sculptures of ballet dancers doing arabesques, as these showed movement very well, they were his favourite ballet move. Even though the sculptures are still and a block piece they showed movement very well, as a three piece of art, together they showed movement, which was great.
In the exhibtion there was work by scientist Marey and photographer Muybridge, which actually showed movement in the human figure. These worked very well againsnt Degas still drawings.
My favourite of Degas was the Russian dancers I thought they had the most character in them, they colours were bold and bright and they just seemed to have attiutude and passion in them. I thought they were the best. He seemed to capture the movement well in them.

Below is a photo I have taken of a postcard I bought, as it was my favourite. Its 'Russian Dancers' 1899. They just look really cheerfull and happy, they colours are grand and the shapes hes made to show the movement I think work really well!

'Dancers' 1899. The movement and colours I love here. I took this picture and the others below off the royal academy's website.


'Three Dancers (Blue Skirts, Red Bodices)' 1903. Again the colour is beatuiful!


This one below is titled 'La Danse Grecque (Dancing Ballerinas)', 1885-90. The colour is slightly darker here, but I still like it!


I have taken this photo of a postcard I bought. Its off 'Three Dancers, Landscape Scenery' 1895-98. This one is another favourite of mine, I love story told in this painting, its beautiful.


Again I have taken this photo of a postcard and its titled 'The Red Ballet Skirts' 1895-1901. The colour here is so bold and beautiful its lovely!


From these photos I have you have the same excitment and joy from Degas drawings and paintings. Please do go and have a look at the exhibition its incredible!!! I enjoyed it so much, I could go again!!!

STITCH, DAY1

First day of stitch and it looks HARD core, but it also looks brilliant! I loved yesterday it was fantastic. Yes we were only sitting around a table and talking about techniques and ways of entering stitch for the first time, but it has got me excited for the next two weeks to come! Today went around the group looking at our pop-up project work and talking about different techniques to create the drawings into fabric pieces! Working on the sewing machine using the iron, bonda web and other ideas!
When Isobelle came around to me she said my drawings, (of the little mice on the teacups) were very graphic like, with the bold lines, but she told me to work on the sewing machine with the emboderiy foot, drawing my images this way. She told me to do CUT WORK, were you sew the image, but have a piece of different fabric underneath, then cut the top fabric out and you can see the bottom fabric coming through. This is a very large technique which will give me loads of scope. Another technique she showed me was to put a embordiery thread as the bobin and this gives you a thicker line when sewing. When doing this you are working on the reverse, as its the bobin thread that you want to see! She said I should look at my mini minture drawings, and maybe take parts of those so they dont look like drawings, but new patterens! I'm really excited, I think it will be really good and I just want to start!!! YAY!!!
Fabric shopping tomorrow, going to Goldhawk Road to A One Fabrics, should be good, I've never been there before!!! Looking forward to it!
Below are photos of the sample techniques she did to show me, to do and make my own from!!!!


Below on the left handside is a sample of CUT WORK. You can see the blue fabric is the one she had underneath.


Below is a sample of having the embordiery thread as the bobin, you get a thicker line, this I'm really looking forward to having a go at!!!


Cant wait for wednesday to have a go at these techniques on the machines!!!!!

YAYAYAYAYAYAY

Wednesday 9 November 2011

KNITTING 2

Week two of my knitting rotation and more techniques!!!! First things first CABLE. Tricky task I have to say but its alright, got my head around it eventually so its alright. You have to use two transferr tools. Pick up a thread one the right transferr tool and the same on the left tool. Then take the right tool and put the stitch on the left kneedle, then take the left tool and put the stitch on the right kneedle. Then do four rows of knitting then repeat the process and you get cable! Its an alright technique!


Below is a picture of my REVERSE knitting. Here you knit some rows, then you knit some more rows in the different colour, then take that off, then rehook the knitting back on, but turn it round, so you reverse the knitting. You hook it back on where your first colour meets the colour you added. Its tricky, took me a long time to get my head around it, but i'm alright now I think!!


Then we learnt SHAPING. You start with three kneedles threaded, knit three, then like lace holes take the stitch on both sides, and move it to the kneedle on either side to make to wider. You continue this for as long you want, then to make it smaller you decrease by taking the outside stitch inside on both sides it sounds complicated but its actually not! See below, its not the best leave shape but its a start!


Then I made a piece including all these techniques, reversing the sticth, rouching, and holding the stitches, its alright, its looks a tad like a lady I think but its okay!


Then we leant how to use a PUNCH-CARD. This is used to create patterens you see on jumpers, a fairisle patteren and things. You put the card in the top of the machince and thread up with two threads then knit. The card had holes on it which allow you to knit and a pattern is formed with the holes on the card. Its a good process! I have done three, my favourite is the christmas tree one!!


Then we learnt HOOKING ON FABRIC. This is really easy I have done it below with a sheer fabric so I added lace holes underneath so you could see them coming through! You knit a row and then just punch the fabric onto the kneedle and then knit another row to hold the fabric onto it!!


This is more revesring knitting, I wanted to have another go. I have added lace holes also which I think works really well! I also have added some leaves on the top for decoration which I really like, I have sewn beads onto it also!!!


Below is a picture of my TUCK technique, which is the same as the fairisle pattern, you have the punch card, but you just use one thread not two. It hasnt really worked I dont think. I'm not sure there is much of a pattern? Oh well!!!


Below is a little thing I have done which is a picot edge and some rocuhing the fabric together! Its just a little sample, but I like it!!!


So there you go lots of knitting samples! I really like the knitting process its great fun! On thrusday we are shown how to press the fabric so it doesnt curl at the edges which will be good! We are almost mounting our work!!
We were shown casting off today but I cant do it so I gave up, SORRY!!!